
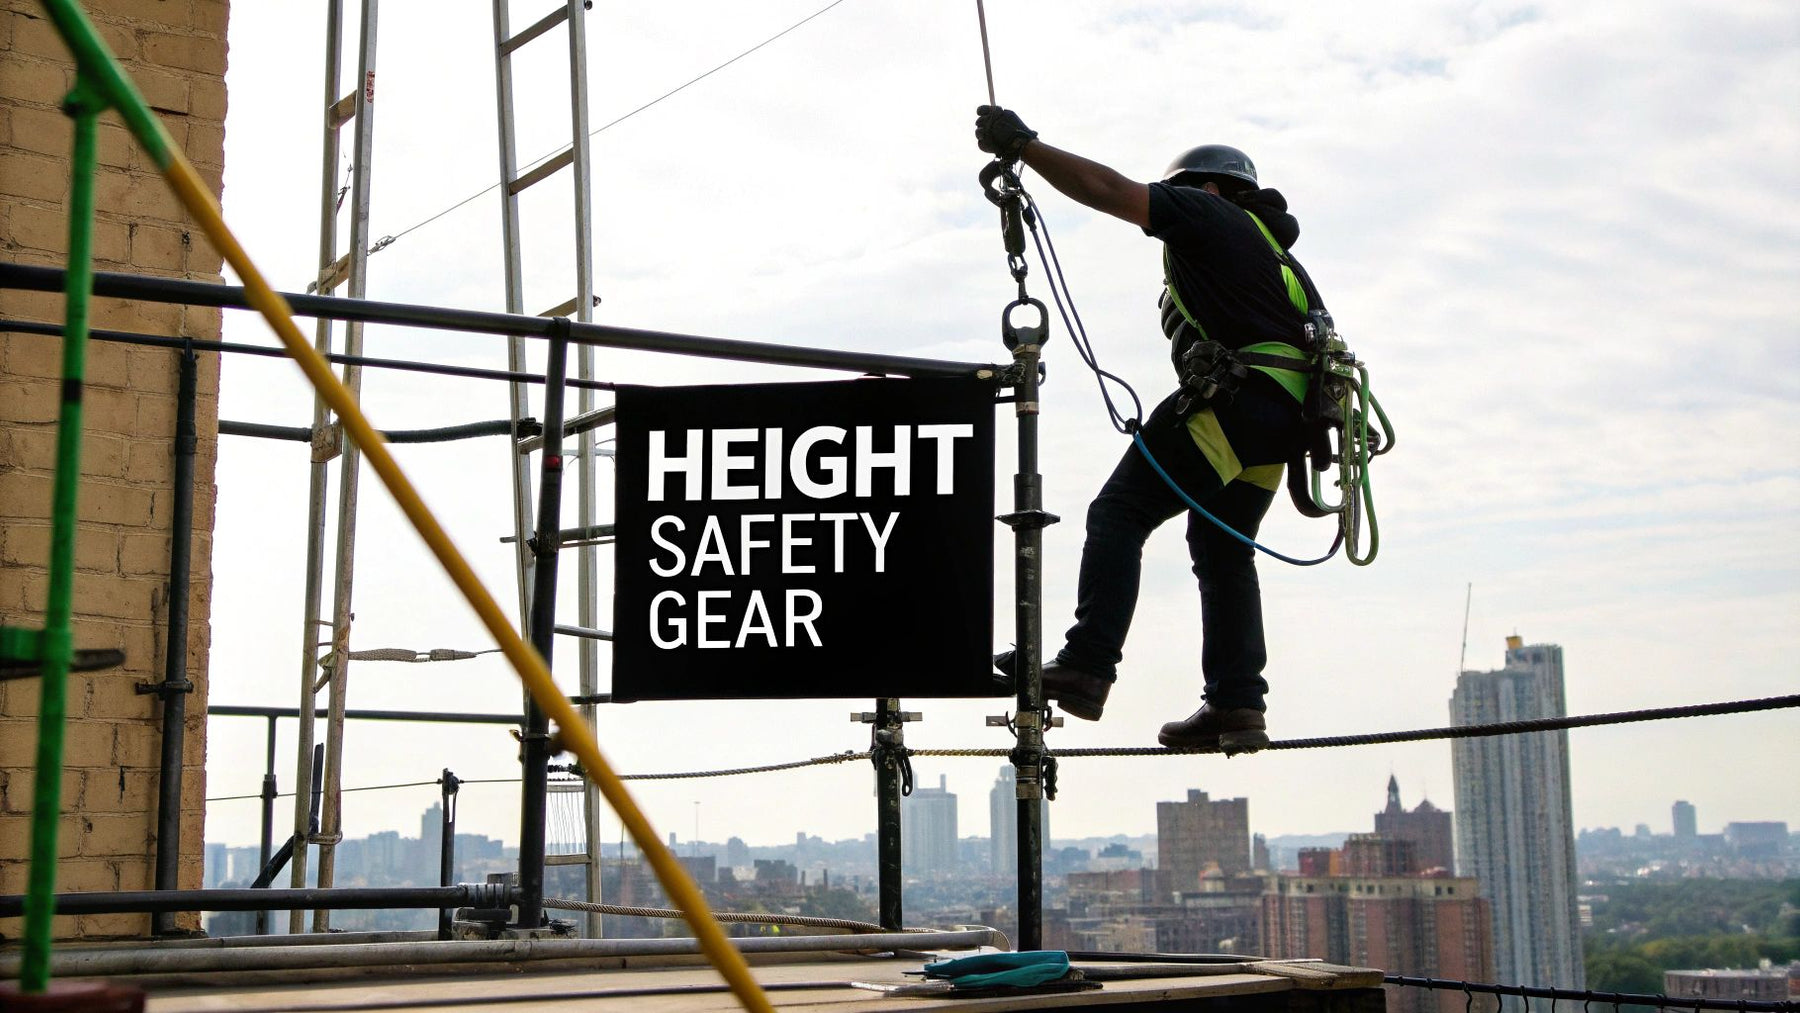
A UK Guide to Working at Height Safety Equipment
Working at height is one of the riskiest jobs in any UK industry. Using the right working at height safety equipment isn't just about ticking a box for the regulations—it's a life-saving decision. The proper gear, whether it's a harness or a simple guardrail, is often the only thing standing between a routine task and a life-changing accident. As a family-owned British company since 1972, we believe it’s what gives every worker the confidence to do their job and get home safely.
The Unspoken Risks of Working at Height
Staring down from a high place, the risks feel immediate and personal. But what do the numbers truly say? It's all too easy to become complacent, especially on jobs you do every day. The first step towards building an unbreakable safety culture is to face the stark reality of workplace accidents here in the UK. This isn't about paperwork; it's about protecting lives.

Confronting the Hard Facts
The statistics paint a sobering picture. For more than two decades, falls from height have consistently been the number one cause of fatal injuries at work in the UK. According to the Health and Safety Executive (HSE), in the latest 2023/24 data, 50 workers lost their lives due to falls from height. That's a staggering 36% of all workplace fatalities for the period.
This isn't a one-off. Since 2001/02, falls from height have topped this grim list, with a five-year average of 38 deaths per year. You can learn more about these critical fall from height statistics and awareness campaigns on the HSE website.
These incidents aren't just numbers on a report. Each one represents a family devastated and a team left picking up the pieces. Look closer at these tragedies, and you'll often find a failure in one of three key areas:
- Inadequate Risk Assessment: Not properly identifying the real hazards before the job even starts.
- Improper Equipment Selection: Using the wrong bit of kit for the task or the environment.
- Lack of Training and Supervision: Workers who aren't fully competent or are left unmonitored.
From Fear to Empowerment
Knowledge is what turns fear into empowerment. Once you understand the genuine dangers and your legal duties, you can make informed choices that actively prevent accidents from happening in the first place. This guide is designed to be a practical, no-nonsense resource for everyone from site managers to individual tradespeople across the UK.
Our goal is simple: to give you clear, actionable advice. We want to help you choose the correct equipment, understand the regulations without the jargon, and build a workplace where every single member of your team gets home safely, every single day. It's about taking control of your environment and protecting your people.
Understanding Your Legal Duties Under UK Regulations
Getting your head around safety laws can feel like you're trying to piece together a complex puzzle. The good news? When it comes to working at height safety equipment and procedures in the UK, the core ideas are refreshingly straightforward and mostly based on good old-fashioned common sense. The main rulebook you need to know is the Work at Height Regulations 2005, which lays out a very clear framework for keeping people safe.
This isn't about becoming a legal expert overnight. It’s about grasping a simple, practical way of thinking about risk. The regulations are built on a concept called the "hierarchy of control," which is just a sensible method for prioritising your safety steps. Think of it as a three-tier safety net, designed to catch any potential problems long before they can cause harm.
The law isn’t just a list of dos and don'ts; it’s a direct order to plan responsibly. The Work at Height Regulations 2005 is the backbone of UK safety law for any work done off the ground, demanding proper planning, risk assessment, and the use of the right gear. But despite these clear rules, things like poor planning, a lack of supervision, and badly maintained equipment are still the top preventable causes of falls. It's worth looking at the UK fatal injury statistics to see just how badly things can go wrong when these duties are ignored.
The Hierarchy of Control Explained
This hierarchy is your go-to checklist whenever you're planning a job that involves height. It forces you to think about your options in a specific order, always starting with the safest possible solution first.
-
1. Avoid Working at Height: The first and most critical question is always: can this job be done safely from the ground? For instance, could windows be cleaned with a long-reach pole system instead of sending someone up a ladder? Can a part be assembled on the ground and then hoisted into position? If you can get rid of the risk completely, that’s what you must do.
-
2. Prevent Falls: If working at height is the only way, your next job is to use equipment that prevents a fall from even being possible. We call this collective protection (which protects everyone, like guardrails) or personal protection (which protects one person, like a restraint system). Good examples include using a cherry picker (MEWP) with its built-in guardrails or a fall restraint lanyard that’s short enough to stop a worker from ever reaching an unprotected edge.
-
3. Minimise Consequences: You should only consider this final step when you absolutely cannot prevent a fall. This is where you bring in measures that minimise the distance and impact of a fall. It's the territory of fall arrest systems—your harnesses, lanyards, and anchor points. Remember, this is your last line of defence, not your first port of call.
Your Core Responsibilities
Whether you're running a business or you're self-employed, the regulations put clear responsibilities on your shoulders. You are legally required to make sure all work at height is properly planned out, supervised by someone who knows what they're doing, and carried out by competent people. That includes choosing the right equipment and making sure it's inspected and looked after properly.
Crucial Takeaway: The law requires you to do everything that is "reasonably practicable" to ensure safety. This isn't about ticking boxes or doing the bare minimum. It means you must actively look for risks and put the most effective safety measures in place to control them.
For anyone working on UK sites, understanding specific qualifications is part of your legal duty. This often means knowing the CSCS card requirements for construction sites to ensure every person on the job is properly certified for their role. At the end of the day, compliance is all about creating a safe system where every risk has been thought about and dealt with.
Choosing the Right Fall Protection System
Picking the right working at height safety equipment is the most critical decision you'll make before any job kicks off. It's not about grabbing the most expensive kit off the shelf; it's about having the correct gear for the specific task you're facing. Getting this wrong can be just as dangerous as using no equipment at all.
To get it right, you first need to get your head around the two main philosophies of fall protection: fall restraint and fall arrest.
Think of it this way: a fall restraint system is like a short, sturdy leash keeping a dog from wandering onto a busy road. It physically stops them from ever reaching the danger. A fall arrest system, on the other hand, is the safety net below a trapeze artist—it doesn't stop the fall, but it’s there to catch you and prevent a catastrophe.
Fall Restraint: The Proactive Choice
A fall restraint system is all about preventing you from reaching a fall hazard in the first place. By using a fixed-length lanyard, or an adjustable one set to the perfect length, a worker is tethered in a way that makes it physically impossible for them to step over an unprotected edge.
This approach is always the preferred option because it stops a fall from ever happening. It's a truly proactive measure that keeps everyone safely inside a designated work zone.
- Key Equipment: A full-body harness, a fixed or adjustable lanyard, and a secure anchor point.
- Best For: Jobs like roof maintenance or inspections where you're working near an edge but don’t have to work directly over it.
Fall Arrest: The Reactive Safety Net
A fall arrest system is designed to safely stop a fall that's already in progress. This is your reactive measure, used only when fall restraint just isn't practical for the job. This kind of setup includes a full-body harness, a shock-absorbing lanyard or a self-retracting lifeline, and a certified anchor point strong enough to handle the immense force of a fall.
The entire goal here is to minimise the fall distance and absorb the massive kinetic energy generated, reducing the forces on the worker's body to a survivable level. This is your last line of defence when all else fails.
- Key Equipment: A full-body harness, a shock-absorbing lanyard or self-retracting lifeline (SRL), and a robust anchor point.
- Best For: Tasks that demand you work over an edge, common in construction, steel erection, or when accessing areas where a fall hazard is simply unavoidable.
To help put these concepts into perspective, the chart below shows how they fit into the hierarchy of control, highlighting the risk reduction each step offers.
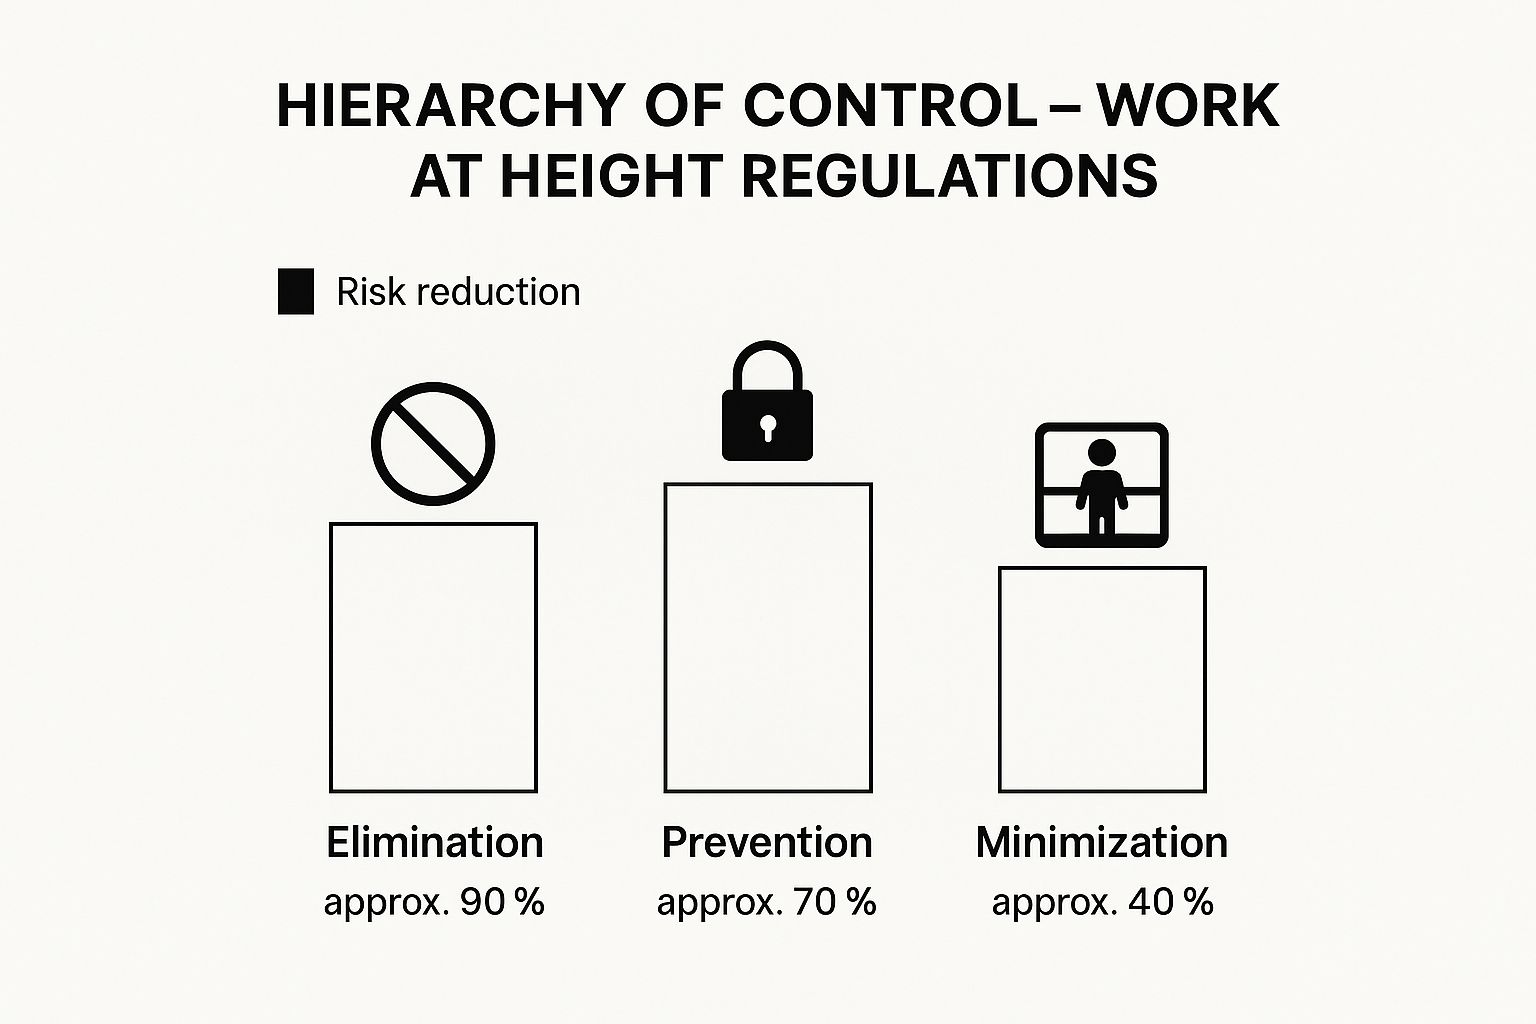
As you can see, preventing a fall from happening in the first place gives you a much bigger safety advantage than just planning to catch someone after they've already gone over the edge.
To make the distinction crystal clear, here’s a quick comparison of the two systems.
Fall Restraint vs Fall Arrest Systems
| System Type | Primary Goal | Key Equipment Examples | Best For |
|---|---|---|---|
| Fall Restraint | Prevent a fall from occurring | Fixed-length or adjustable lanyards, body harness, anchor point | Working near an edge (e.g., flat roof inspections) |
| Fall Arrest | Stop a fall in progress safely | Shock-absorbing lanyards, self-retracting lifelines, body harness, anchor point | Working over an edge (e.g., steel erection, construction) |
Ultimately, choosing between restraint and arrest comes down to a simple question: can you do the job without ever being exposed to the fall hazard? If the answer is yes, restraint is the way to go.
Collective vs Personal Protection
Beyond the restraint versus arrest debate, there's another crucial layer to your decision: are you protecting a group or an individual?
Collective Protection systems are the gold standard. Why? Because they protect everyone in a work area without them needing to clip on, adjust, or even think about personal gear. They are passive, meaning they do their job without anyone having to take action.
Collective systems create a safe environment for multiple people simultaneously. They are the preferred solution under the Work at Height Regulations whenever reasonably practicable.
Examples are all around us:
- Guardrails: Temporary or permanent railings installed around the perimeter of a roof or elevated platform.
- Scaffolding: A properly built scaffold provides a secure, fully guarded working platform.
- Mobile Elevated Work Platforms (MEWPs): Often called cherry pickers or scissor lifts, these have built-in guardrails that form a safe working cage.
- Loft Hatch Rails: Simple but incredibly effective barriers like the British-made Bison loft hatch safety rail can prevent serious falls through internal openings.
Personal Protection systems, as we've discussed, are all about protecting a single individual. They absolutely require the user to be properly trained in how to select, inspect, and use the equipment correctly. While essential, they should only be the go-to solution when collective systems just aren't feasible for the task. Your final choice will always hinge on a thorough risk assessment of the job, the environment, and the people involved.
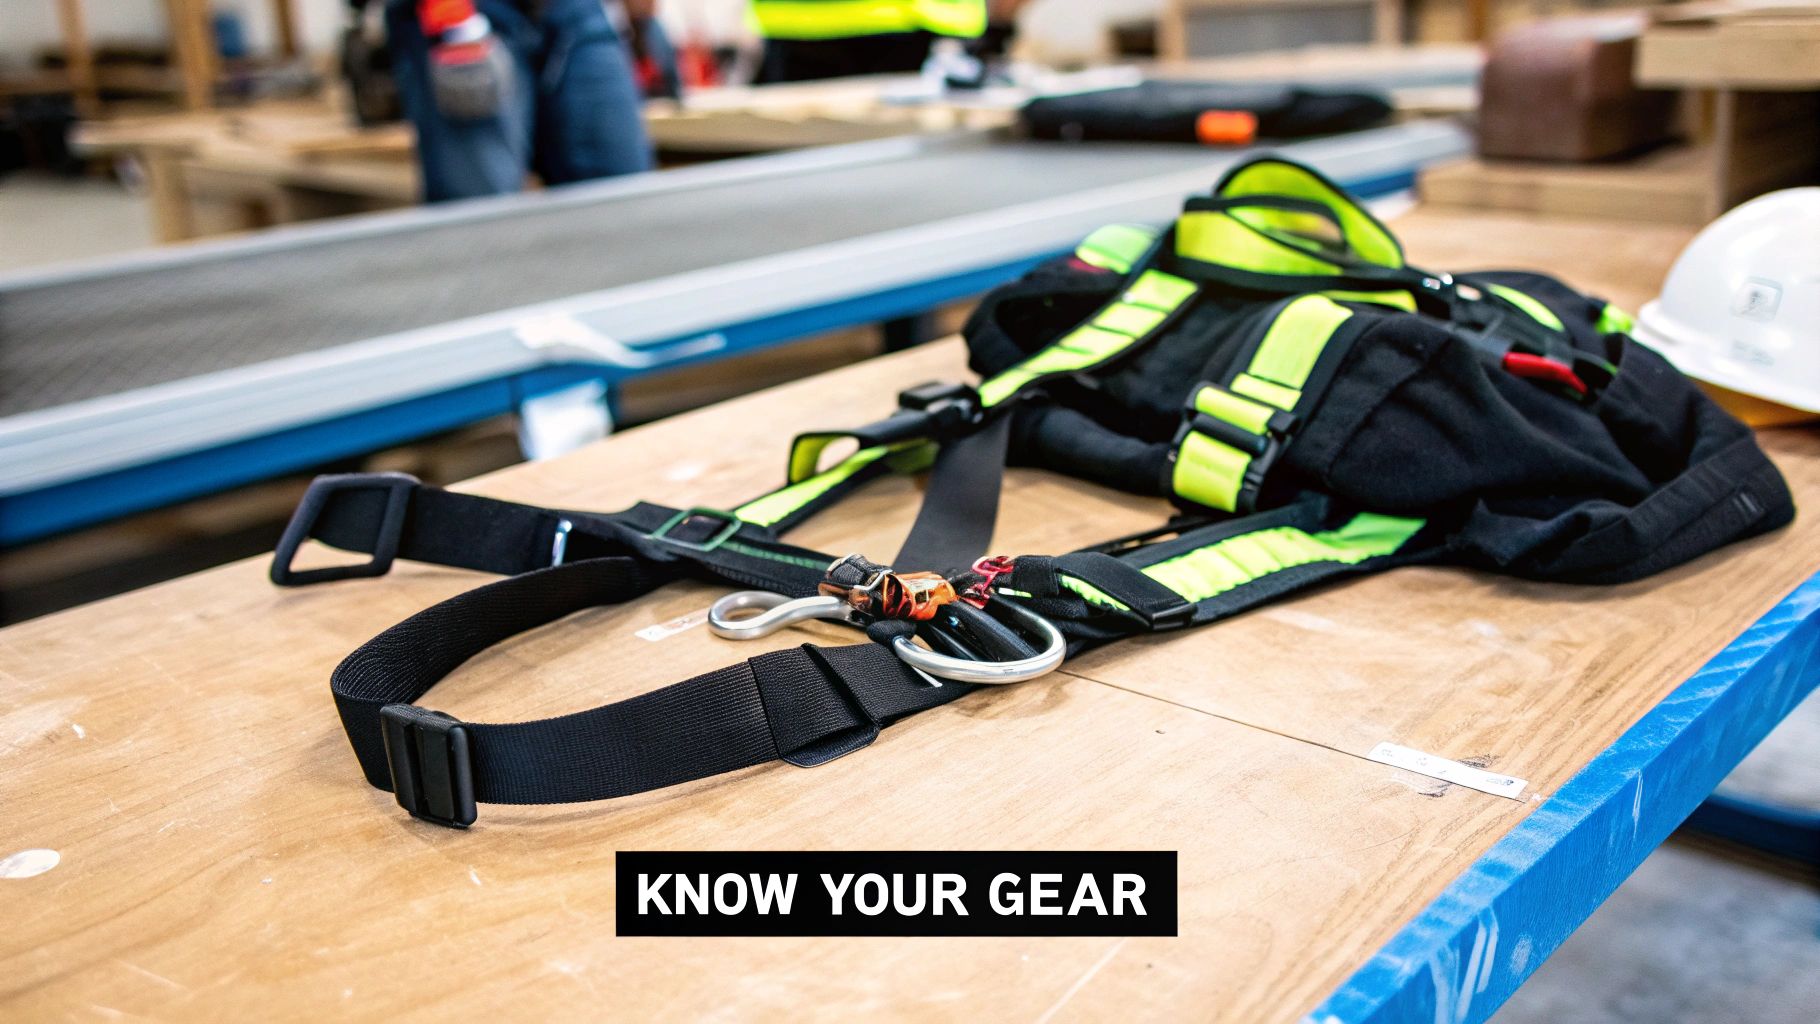
Your Personal Fall Protection Equipment Explained
When collective systems like guardrails just aren't practical, the focus has to shift to the gear that connects directly to you. This is your Personal Fall Protection Equipment (PFPE), and understanding how each part works together is completely non-negotiable. It might look like a jumble of straps and clips, but it’s actually a life-saving system built on simple yet brilliant engineering.
To keep things straightforward, let’s break it down into the ‘ABC’ of fall arrest.
A is for Anchorage
The entire system is utterly useless without a rock-solid anchor point. This is the secure point of attachment for your gear, and it has to be strong enough to handle the immense forces generated during a fall. Regulations specify it must be capable of sustaining a load of at least 10 kilonewtons (kN) — that's roughly equivalent to the weight of a small car.
Choosing an anchor point isn't guesswork. It absolutely must be:
- Structurally Sound: Think steel beams, reinforced concrete, or specially designed anchor systems. Never, ever use things like guardrails, pipework, or gutters.
- Positioned Correctly: Your anchor point should ideally be located directly above you. This simple step minimises the potential swing distance (known as the 'pendulum effect') if you do fall, which stops you from colliding with nearby structures.
B is for Body Support
This is your full-body harness, and it’s the only acceptable piece of kit for body support in fall arrest work. A simple waist belt is not just insufficient; it's extremely dangerous. It concentrates all the fall forces onto your abdomen, which can lead to severe internal injuries.
A proper full-body harness is designed to spread the impact of a fall across the strongest parts of your body—your shoulders, upper thighs, and pelvis. Not all harnesses are the same, though; they come in different designs for different jobs:
- General-Purpose Harnesses: These have a single D-ring on the back, perfect for most standard fall arrest situations.
- Positioning Harnesses: These include extra D-rings on the hips, allowing a worker to be supported in a specific position to work hands-free.
- Rescue Harnesses: These often feature extra attachment points to make it easier for a rescue team to connect and retrieve a suspended worker.
C is for Connectors
Connectors are what link your harness to the anchor point. This category mainly covers lanyards and self-retracting lifelines (SRLs), but they do a lot more than just connect you.
The most critical component here is the energy absorber. If you fell while connected to an anchor with just a simple rope, the sudden jolt at the end would generate enough force to cause serious, if not fatal, injury. A shock-absorbing lanyard contains a special core designed to tear and deploy during a fall. This action extends the deceleration distance, dramatically reducing the impact forces on your body to a survivable level.
For tasks that require vertical movement, like climbing a permanent ladder, you'll often find that specialised equipment is needed. Tools like a roof hook ladder extension provide a secure way to move from the ladder to the roof, acting as a stable extension of your access system.
Calculating Fall Clearance Distance
This is where so many people get into serious trouble. You must have enough clear space below you for your fall arrest system to actually do its job. It’s a life-saving calculation you have to perform before starting any task at height.
Fall clearance is the minimum vertical distance needed between your feet and the next lower level (or any obstruction) to make sure you don't hit it in the event of a fall.
To work it out, you need to add up a few key distances:
- Lanyard Length: The full length of your connecting lanyard.
- Deceleration Distance: The extra length the energy absorber adds when it deploys (check the manufacturer’s label, but it's typically around 1.75 metres).
- Harness Stretch: The amount your harness and D-ring will shift upwards during a fall (usually about 0.3 metres).
- Safety Margin: A required additional clearance to be safe (a minimum of 1 metre).
Example Calculation:
- Lanyard Length = 2 metres
- Deceleration Distance = 1.75 metres
- Harness Stretch = 0.3 metres
- Safety Margin = 1 metre
- Total Clearance Needed = 5.05 metres
If you don't have over 5 metres of clear space below you, a standard 2-metre lanyard is the wrong piece of equipment for the job. You'd need to look at a shorter lanyard or a self-retracting lifeline, which locks almost instantly and significantly cuts down the fall distance. Getting this simple sum right is one of the most important parts of using working at height safety equipment correctly.
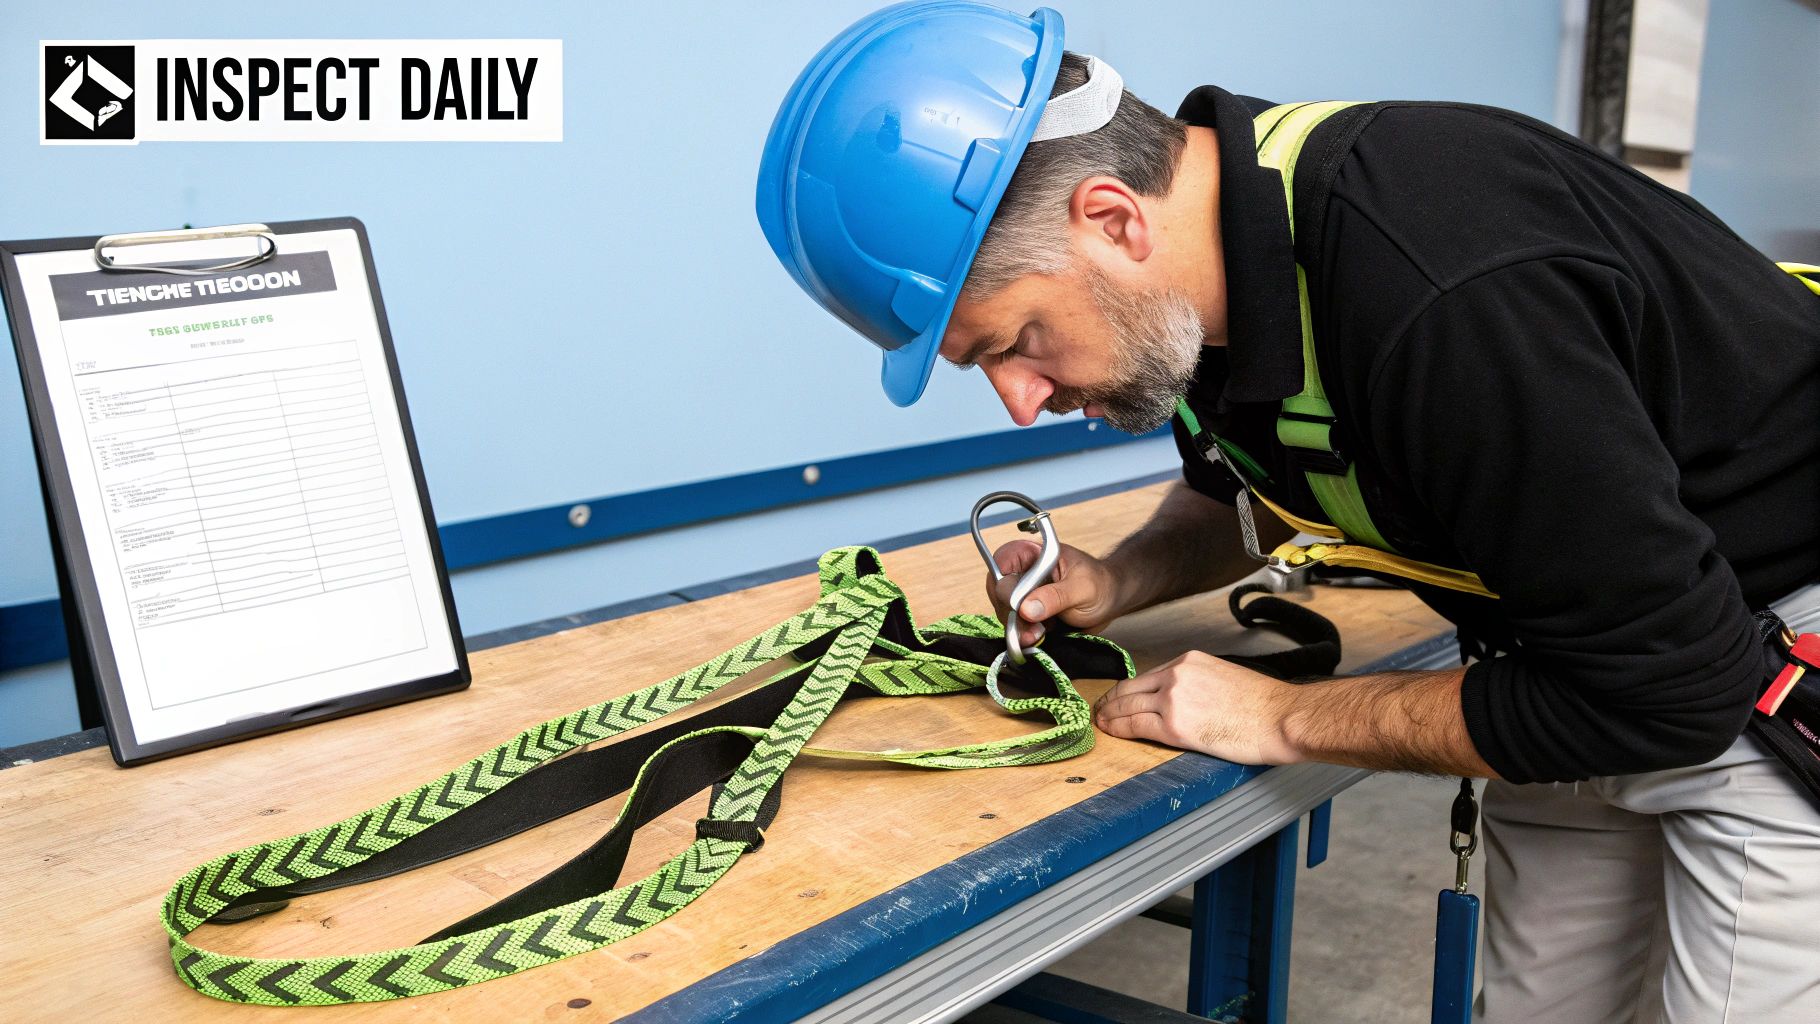
Inspection and Maintenance as Your First Defence
Investing in the best working at height safety equipment is a fantastic first step, but it’s only half the battle. Think about it: the most advanced harness or lanyard is completely useless if it’s damaged or worn out.
That’s why you need to see inspection not as a chore, but as your first and most important line of defence against equipment failure. It's the regular checks that turn a piece of kit into a reliable lifesaver you can trust, day in and day out.
Getting this wrong isn’t an option. The cost of neglecting working at height safety in the UK is staggering, both in human lives and massive fines. The Health and Safety Executive (HSE) has been handing out increasingly large penalties for non-compliance; 2025 saw a record-breaking health and safety fine of £6 million.
These penalties are a direct response to preventable accidents, with falls from height consistently being a top cause of workplace deaths. The 2023/24 figures showed that falls and vehicle strikes accounted for around 70% of all fatal workplace injuries. You can learn more about the UK's highest health and safety penalties to see why this diligence is simply non-negotiable.
The Two-Tier Inspection System
A solid inspection routine really comes down to two key parts: the daily pre-use check and the formal periodic inspection. Both are legally required and work together to create a complete safety net.
- Pre-Use Checks: This is a quick, hands-on inspection that you, the user, must carry out every single time before you put on your equipment. It's your personal responsibility.
- Formal Inspections: This is a much deeper dive, a detailed examination done by a competent person at regular intervals. Typically, that’s every six months, but it needs to be more often if your gear is used in harsh environments.
Your Pre-Use Checklist
Before you even think about clipping in, you need to give your personal gear a thorough once-over. This should only take a few minutes, but it could be the most important few minutes of your day.
For Your Harness:
- Webbing: Run the straps through your hands. You’re feeling for any cuts, burns, frays, or chemical damage. Check for any bits that feel brittle, hard, or look discoloured.
- Stitching: Look closely at all the stitched areas for any pulled or broken threads. Pay special attention to where the straps join together.
- Buckles and D-Rings: Check for any cracks, distortion, sharp edges, or signs of rust. Make sure every buckle clicks into place smoothly and holds tight.
For Your Lanyard:
- Rope/Webbing: Just like with the harness, check the entire length for cuts, fraying, or burns.
- Connectors/Karabiners: Make sure the gates open and shut properly. Critically, check that the locking mechanism engages securely every single time.
- Shock Absorber Pack: Check the outer cover for any damage. Most importantly, look at the fall indicator—if it has been deployed, the lanyard is no longer safe and must be taken out of service immediately.
Golden Rule: If you find any defect, no matter how small it seems, do not use the equipment. Immediately remove it from service, tag it clearly as "UNSAFE," and tell your supervisor. When in doubt, throw it out.
The Importance of Proper Storage and Record-Keeping
How you store your equipment is just as important as how you inspect it. After you’ve used it, your gear should be wiped clean of any dirt or moisture and stored in a cool, dry place away from direct sunlight, chemicals, and anything corrosive. Simply tossing a wet harness into the back of a van is a recipe for disaster and will ruin it over time.
Finally, every single formal inspection must be logged. UK law requires a clear record showing the inspection date, what was found, and who carried it out. This isn't just about paperwork; it’s a formal history of your equipment's health, proving your commitment to maintaining your first line of defence.
Building a True Culture of Safety
Having the best working at height safety equipment is a great start, but it’s only one piece of the puzzle. The most advanced harness or guardrail system can’t do much to prevent human error or complacency on its own. True safety isn’t just about the kit you own; it's about what your team does, thinks, and values every single day on site.
This is all about moving beyond a simple compliance mindset, where safety is just a list of rules to be ticked off. The goal is a proactive safety culture, an environment where looking out for one another is second nature and everyone feels confident enough to speak up.
The Human Element in Safety
Equipment doesn't make decisions, people do. A genuine safety culture is built on a foundation of shared responsibility and constant vigilance. It turns individual awareness into collective protection, supported by solid training, supervision, and open communication.
Complacency is the silent enemy on any worksite. It has a nasty habit of creeping in during those routine tasks, the ones you’ve done a hundred times without a single issue. This is where active supervision and regular toolbox talks become absolutely vital, serving as a constant reminder that the risks are always there, no matter how familiar the job feels.
A strong safety culture empowers every single worker to stop a job if they feel it's unsafe, without fear of reprisal. This is the ultimate safety net—a team that actively protects itself.
Key Pillars of a Safety-First Culture
Creating this kind of environment requires a conscious and continuous effort. It means focusing on three core areas that support your people just as much as your equipment does.
- Comprehensive Training: This goes way beyond a one-off induction course. We're talking regular refreshers, practical, hands-on demonstrations, and task-specific instructions. It’s about making sure every team member not only knows how to use the equipment but really understands why it's so critical.
- Active Supervision: A good supervisor is a mentor, not just a monitor. They should be on the ground reinforcing good practices, constructively correcting unsafe behaviours, and, most importantly, leading by example.
- Open Communication: Everyone on site, regardless of their role, should feel comfortable raising concerns or pointing out potential hazards. Fostering this environment means genuinely listening to feedback and acting on it, proving that every voice matters when it comes to safety.
To really bring these programmes to life, it’s worth exploring modern tech aids. For instance, some companies are now incorporating Augmented Reality safety programs in the workplace to great effect.
From Work Plan to Rescue Plan
One critical, yet often overlooked, part of a safety culture is planning for the worst-case scenario. Having a detailed work plan is standard practice, but having a robust rescue plan is just as important.
What happens in those crucial moments after a fall arrest system has done its job? A worker suspended in a harness is still in grave danger from suspension trauma. Your team needs a clear, well-practised plan to retrieve them quickly and safely. This plan has to be in place before any work at height even begins.
Proper training and clear procedures are non-negotiable here. Even foundational habits, like those covered in our guide on good ladder etiquette, contribute to a safer working environment.
Ultimately, the goal is to embed safety so deeply into your organisation that it becomes part of its DNA. By combining the right equipment with a team that is trained, supervised, and empowered, you build a workplace where everyone goes home safe at the end of every single shift.
Frequently Asked Questions
Even when you've got a good grip on the rules and your kit, questions always pop up on site. It's only natural. Here are some straightforward answers to the queries we hear most often about working at height safety equipment.
How Long Does a Harness Last?
This is a big one, and the answer isn't as simple as checking a date on the label. The real lifespan of a harness comes down to how it's used and looked after, not just when it was made. While manufacturers might suggest a maximum life of around 10 years from the date of manufacture for textile gear, that's assuming it's been stored in perfect conditions.
The honest answer? A harness is good until it fails an inspection. If it’s put through its paces daily in tough environments—think constant sunlight, chemical exposure, or rubbing against rough surfaces—it might only last a year, maybe even less. Regular, detailed inspections are the only real way to know if a harness is still safe to use.
How Often Do I Need Working at Height Training?
UK regulations don't actually put a fixed expiry date on your training certificate. What the law does say is that workers must remain "competent" to do their job safely. Competence is a mix of three things: proper training, hands-on experience, and up-to-date knowledge.
As a general rule of thumb, most organisations in the UK book in refresher training every 3 to 5 years. You'll definitely want to get retrained sooner, though, if:
- You start using a completely new type of equipment.
- Your job changes and involves different kinds of work at height.
- There's an incident or a near-miss that shows there are gaps in your team's knowledge.
- You've had a long break from working at height.
What Should I Do If I See Someone Working Unsafely?
If you see something, you have to say something. An unsafe worker isn't just a danger to themselves; they're a risk to everyone on site. If you feel it's safe to, your first move should be to have a quiet word with the person. Approach them calmly and explain your concerns without being confrontational.
If you aren't comfortable speaking to them directly, or if they brush off your concerns, you must report it to your supervisor or the site manager straight away. Never just turn a blind eye and hope someone else will sort it out. Building a true safety culture means everyone feels responsible for looking out for each other and stopping an accident before it happens.
Remember, stepping in isn't about getting someone in trouble. It’s about making sure every single person on site gets home safely at the end of the shift. That’s a collective responsibility.
For more in-depth answers on our products and general safety, you can always head over to our comprehensive FAQs page. We're constantly updating it based on the questions we get from professionals just like you.
At Bison Products, our commitment is to provide top-quality, British-made safety solutions that protect your team. Take a look at our full range of ladder safety and access equipment to make sure your site is not just compliant, but genuinely safe. https://www.bisonproducts.co.uk